
 Question
Using HTML5 Semantic Elements
Instructions: In this exercise, you will use your text editor to add and style HTML5 semantic
elements. You insert section, article, and aside elements in an HTML document. You then add
a style rule to format each element. Work with the apply07.html file in the apply folder and the
applystyles07.css file in the apply\css folder from the Data Files for Students. The completed
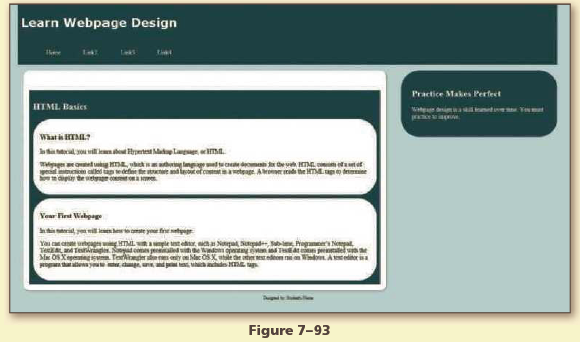
webpage is shown in Figure 7–93. You will also use professional web development practices to
indent, space, comment, and validate your code.
Perform the following tasks:
1. Open apply07.html in your browser to view the webpage.
2. Open apply07.html in your text editor, review the page, add a title, modify the comment at the
top of the page to include your name and today’s date, and replace “Student’s Name” with your
name in the footer element.
3. Open the applystyles07.css file from the apply\css folder. Modify the comment at the top of the
style sheet to include your name and today’s date.
4. In the apply07.html file, add a section element within the main element.
5. Add the following heading within the section element: <h2>HTML Basics</h2>
6. Add the following two article elements within the section element:
<article>
<h3>What is HTML?</h3>
<p>In this tutorial, you will learn about Hypertext Markup Language,or HTML.</p>
<p>Webpages are created using HTML, which is an authoring language
used to create documents for the web. HTML consists of a set of special
instructions called tags to define the structure and layout of
content in a webpage. A browser reads the HTML tags to determine how
to display the webpage content on a screen.</p>
</article>
<article>
<h3>Your First Webpage</h3>
<p>In this tutorial, you will learn how to create your first webpage.</p>
<p>You can create webpages using HTML with a simple text editor,
such as Notepad, Notepad++, Sublime, Programmer’s Notepad, TextEdit,
and TextWrangler. Notepad comes preinstalled with the Windows operating
system and TextEdit comes preinstalled with the Mac OS X operating
system. TextWrangler also runs only on Mac OS X, while the
other text editors run on Windows. A text editor is a program that
allows you to enter, change, save, and print text, which includes HTML tags.</p>
</article>
7. In the apply07.html file, add the following aside element below the main element:
<aside>
<h2>Practice Makes Perfect</h2>
<p>Webpage design is a skill learned over time. You must practice to improve.</p>
</aside>
8. In the applystyles07.css file, create the following style rules:
section {
background-color: #183440;
color: #FFFFFF;
margin-top: 4%;
padding: 1%;
}
article {
background-color: white;
border-radius: 3em;
color: #000000;
margin-top: 1%;
padding: 2%;
}
aside {
background-color: #183440;
border-radius: 3em;
width: 25%;
float: right;
padding: 2%;
margin-top: 1%;
color: #FFFFFF;
}
9. Add appropriate comments above each style rule.
10. Save all of your changes and open the apply07.html in your browser.
11. Validate your HTML document using the W3C validator found at validator.w3.org and fix any
errors that are identified.
12. Validate your CSS file using the W3C validator found at http://jigsaw.w3.org/css-validator/ and
fix any errors that are identified.
13. Submit the files in a format specified by your instructor.
14. In step 8, you applied a float property to the aside element. Describe the purpose of the float
property and discuss another way to achieve similar results.


Sorry the answer is not available at the moment…
If you are able to find the answer, please make sure to post it here. So that your Juniors have smile on their lips and feel happy.
Spread the 'tradition of sharing'.